Along with Apps, SharePoint 2013 has introduced App Parts (ClientWebParts) which give you the functionality of placing the app inside and iframe on a page. This way, you can view your app as a part of the page just like you would a normal webpart.
(The terms App Part and Client Web Part are interchangeable. I will be using both the terms in this post to emphasize the similarity)
Adding an App Part to the page from the SharePoint User Interface is pretty easy. You just put the page in edit mode and add the AppPart from the Insert Menu. Pretty similar to how you would add a regular WebPart.
Now what if you have to provision your AppPart in a Page or a PageLayout so that when a new page is created with a feature, your AppPart is automatically placed on that page?.
If you want to know how to add an app part to a page declaratively through the Elements.xml file, please have a look at my post here:
http://vrdmn.blogspot.in/2013/03/sharepoint-2013-declaratively-add-app.html
Lets look at how it can be done:
First and foremost, you will need to create an AppPart (Client WebPart) for your app. Here is a great tutorial on it:
http://msdn.microsoft.com/en-us/library/fp179921.aspx
Your Client WebPart xml file should be similar to this:
Here, I have created a Client Web Part with 2 Properties of type int and enum respectively.
Second, you have to make sure that your app is already installed on the Web on which you will be provisioning your page. The AppPart will only work if the app is installed on the same web.
Next, you will need the ProductId of your app. Here is how to find it:
1) Open your app in Visual Studio -> Right Click on the AppManifest.xml -> View Code
3) Save your ProductId in a convenient location.
4) Now open your Page or Page Layout and add the following code to it:
In FeatureId, enter the ProductId which we got from the app earlier.
In ProductWebId, create a new random GUID and add it.
You can even set default values for the App Part Properties.
5) That's It, Now deploy your page and see that the App Part is Provisioned on the Page.
(The terms App Part and Client Web Part are interchangeable. I will be using both the terms in this post to emphasize the similarity)
Adding an App Part to the page from the SharePoint User Interface is pretty easy. You just put the page in edit mode and add the AppPart from the Insert Menu. Pretty similar to how you would add a regular WebPart.
Now what if you have to provision your AppPart in a Page or a PageLayout so that when a new page is created with a feature, your AppPart is automatically placed on that page?.
If you want to know how to add an app part to a page declaratively through the Elements.xml file, please have a look at my post here:
http://vrdmn.blogspot.in/2013/03/sharepoint-2013-declaratively-add-app.html
Lets look at how it can be done:
First and foremost, you will need to create an AppPart (Client WebPart) for your app. Here is a great tutorial on it:
http://msdn.microsoft.com/en-us/library/fp179921.aspx
Your Client WebPart xml file should be similar to this:
Here, I have created a Client Web Part with 2 Properties of type int and enum respectively.
Second, you have to make sure that your app is already installed on the Web on which you will be provisioning your page. The AppPart will only work if the app is installed on the same web.
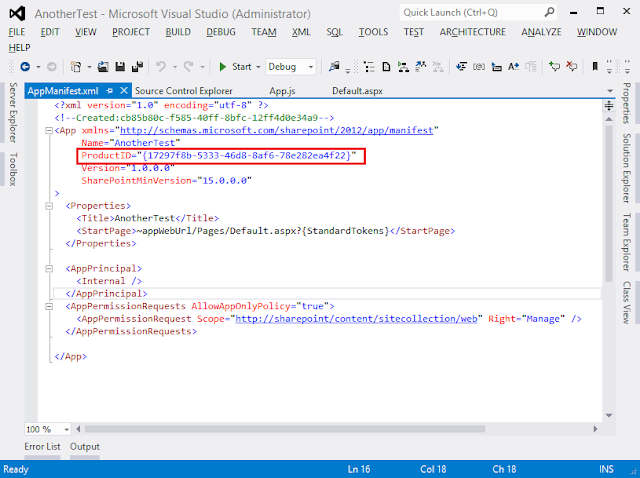
Next, you will need the ProductId of your app. Here is how to find it:
1) Open your app in Visual Studio -> Right Click on the AppManifest.xml -> View Code
2) Here you will find the ProductId of your app in the following location:
4) Now open your Page or Page Layout and add the following code to it:
In FeatureId, enter the ProductId which we got from the app earlier.
In ProductWebId, create a new random GUID and add it.
You can even set default values for the App Part Properties.
5) That's It, Now deploy your page and see that the App Part is Provisioned on the Page.

