Quantcast
Channel: Vardhaman Deshpande
Viewing all 134 articles
Browse latest View live

Web Development Tools & Reference

$
0
0
Just a list of tools and reference material which I think is really useful for Web Development:

JavaScript:


1) jslint : http://www.jslint.com/

JSLint is a JavaScript program that looks for problems in JavaScript programs. It is a code quality tool. JSLint takes a JavaScript source and scans it. If it finds a problem, it returns a message describing the problem and an approximate location within the source. The problem is not necessarily a syntax error, although it often is. JSLint looks at some style conventions as well as structural problems. It does not prove that your program is correct. It just provides another set of eyes to help spot problems.

2) jsperf : http://jsperf.com/

jsPerf aims to provide an easy way to create and share test cases, comparing the performance of different JavaScript snippets by running benchmarks.

3) jsfiddle: http://jsfiddle.net/

Test and share JavaScript, CSS, HTML or CoffeeScript online.

4) JavaScript Garden : http://bonsaiden.github.com/JavaScript-Garden/

JavaScript Garden is a growing collection of documentation about the most quirky parts of the JavaScript programming language. It gives advice to avoid common mistakes and subtle bugs, as well as performance issues and bad practices, that non-expert JavaScript programmers may encounter on their endeavours into the depths of the language.

Tools


Reference:


1) Mozilla Developer Network : https://developer.mozilla.org/en-US/


Performance:


1) Browser Diet : http://browserdiet.com/

2) Yahoo Best Practices for Speeding up your WebSite: https://developer.yahoo.com/performance/rules.html

3) Google Web Development Best Practices: https://developers.google.com/speed/docs/best-practices/rules_intro?hl=sv

4) Why you should always host jQuery on the Google CDN: http://encosia.com/3-reasons-why-you-should-let-google-host-jquery-for-you/

Improving REST API performance with JSON Light

$
0
0
While browsing the SharePoint 2013 SP1 change log , I came across something really interesting:

2817429​Minimal and no metadata are now enabled as supported JSON formats.

This really caught my attention as it was something I was waiting for. When we make a call with the REST API, there is a lot of additional data which we get back in the response. This additional data consists of the metadata and the Hyper Media Controls along with the required JSON data.  To know more about this, please see this excellent post describing REST Maturity Models: http://martinfowler.com/articles/richardsonMaturityModel.html

This makes the payload size of the REST response too big. If you are developing a REST heavy application, then each extra byte of data that travels over the wire to your client adds up and ends up hampering performance.

I did some digging around and found out that my SharePoint Online Tenant was already supporting these JSON formats! All I had to do was to modify the Accept header of my REST call.

Note: As mentioned before, for these formats to work on an On-Premises SharePoint 2013, you will need to install SP1.

I ran some tests using the Chrome Developer Tools and Postman REST Client to see the effect on the payload size.

All tests were done to simply fetch the current web details with the following api call:


https://siteurl.sharepoint.com/sites/test/_api/web


1) Accept : "application/json;odata=verbose"


According to Microsoft Guidance published before, to get the JSON data back from the REST call, we need to specify the Accept header as "application/json;odata=verbose" But I think that guidance might be a little outdated now. Here is the result of the REST Call made with the above header:

Payload
Size: 2.0 KB
Content Size: 5.1 KB

    (Click on Image to Enlarge)

And here is the JSON we get back. You can see that there is a lot of metadata along with the Hypermedia Controls. 


2) Accept : "application/json;odata=minimalmetadata" (OR Accept : "application/json")


Now when optimizing for performance, we do not need all the metadata and all the Hyper Media Controls as we are only concerned with the JSON data. We can then use this header to optimize them. It will return the required JSON with very minimal metadata attached to it. This is also the default option if you only specify "application/json" in your Accept header without specifying the odata parameter.

Payload
Size: 1.5 KB
Content Size: 1.0 KB

   (Click on Image to Enlarge)

And this is the JSON returned. You can see that the Hyper Media Controls are no longer returned and only some of the metadata is returned.


3) Accept : "application/json;odata=nometadata"


This is the option for the extreme "optimizers" who want no metadata or Hypermedia Controls attached to the response and are only concerned with the JSON

Payload
Size: 1.4 KB
Content Size: 800 Bytes

   (Click on Image to Enlarge)


And this is the JSON returned:

So as you can see, if you want to reduce the payload size from the REST response, you can use the different JSON formats depending on the degree of optimization you want.

Hope you found this information useful!

Start SharePoint 2013 Workflows with JavaScript Client Object Model

$
0
0
This will be a quick post to follow up on couple of my previous posts:

1) Managing SharePoint 2013 Workflows with CSOM

2) Using the SharePoint 2013 Workflow Interop Service in CSOM

In this post, I will show you basically the same thing as in the previous posts, but by using the JavaScript Client Object Model (JSOM).

I recently had a requirement for which I had to start a Nintex Site Workflow with JavaScript. Now due to my previous posts, I had an idea that we can use the Managed CSOM to manage workflows but wanted to see if the same is possible from the JavaScript CSOM.  Nintex Workflows utilize the SharePoint 2010 Workflow Engine and hence we require the Interop Service to work with them in JavaScript.

Here is the code I put together to start my Site Workflow:


You can  have a look at my previous posts and the SP.WorkflowServices.debug.js file to see how to start other workflows such as List Workflows or SharePoint 2013 Workflow Engine workflows from the JavaScript Client Object Model.


Deploy Workflows to Host Web with Integrated Workflow Apps.

$
0
0

In the recent Office 365 Developer YamJam on the Office 365 Technical Network, there were lots of great questions asked to and answered by the Office 365 Engineering Team. You can view all the questions over here: https://www.yammer.com/itpronetwork/#/threads/inGroup?type=in_group&feedId=4419638

One thing which I was interested in was the Integrated Workflow Apps. I have seen a lot of people ask about this as they want to deploy Workflows to their Host Web (or Content Site) from their Apps. I had known that something was in the pipeline as I had seen a glimpse of it in this video from SPC 2014 http://channel9.msdn.com/Events/SharePoint-Conference/2014/SPC3994 

Luckily, Tim McConnell who is the speaker in the video was part of the YamJam and he answered that Integrated Workflow Apps are already available on SharePoint Online but they are waiting for tooling support so no official announcement has been made till now.

I have tested them on my development Office 365 Tenant and it works! In this post, I will be detailing the process by which you can get it working too. 

Please bear in mind that this is a temporary workaround which involves modifying some Manifest XML files. Official tools will be released in the future which will automate this. Till then, use this method for experimental purpose only. Do not use this method to deploy Workflows in Production!

You will need to have installed Visual Studio 2013 and Microsoft Office Developer Tools for Visual Studio 2013 for this. My test project is available on GitHub here: https://github.com/vman/Integrated-Workflow-Apps

1) Start Visual Studio 2013 > New Project > App for SharePoint


2) Enter the SharePoint Online Site Url and select the hosting model for your app. I have selected SharePoint Hosted.


3) Right Click App Project > Add > New Item


 4) Select Workflow and type in a name for your Workflow

(Click on the Image to Zoom)

5) Select the type of Workflow as Site Workflow


(List Workflow Deployment is shown at the end of the post) 


6) Select "Create New" for History List and Task List.


7) Add some sample activities to your Workflow.


I have added a LookupWorkflowContextProperty to get the current Site Url and a WriteToHistory activity which will write the Current Site Url to the History List

(Click on the Image to Zoom)

(Click on the Image to Zoom)

8) Give your App Manage Permissions on the Web:


9) Right click App Project > Publish > Package the app. A window will pop up showing you the packaged .app file.

(Click on the Image to Zoom)

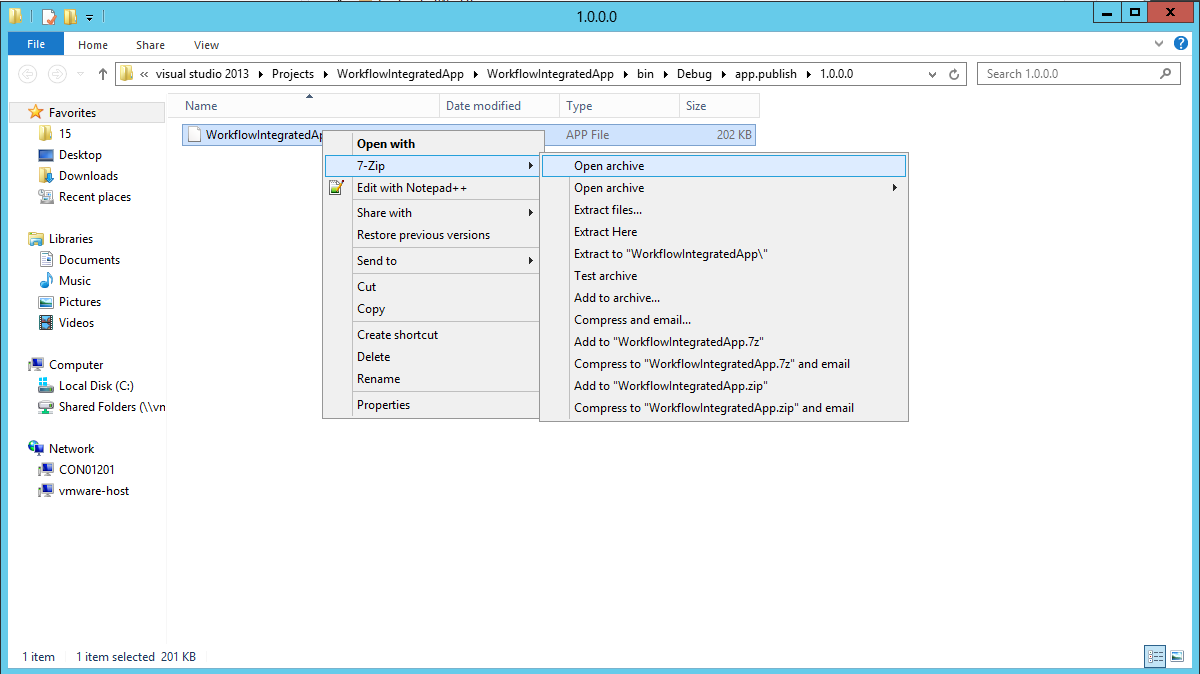
10) Now the interesting part. Open the .app file as an archive with a tool of your choice.


 I have used 7-Zip which is a really awesome tool. You can download it from here: http://www.7-zip.org/

(Click on the Image to Zoom)

11) Once opened, look for the WorkflowManifest.xml file and open it. It will be empty to start with. Copy the following in the file and save it.


(Click on the Image to Zoom)

12) After Clicking save, you will get the following prompt. Click Ok. 


13) Now your .app package is ready to be deployed to your App Catalog. Go to your App Catalog and upload the .app file in the "Apps for SharePoint" document library. 


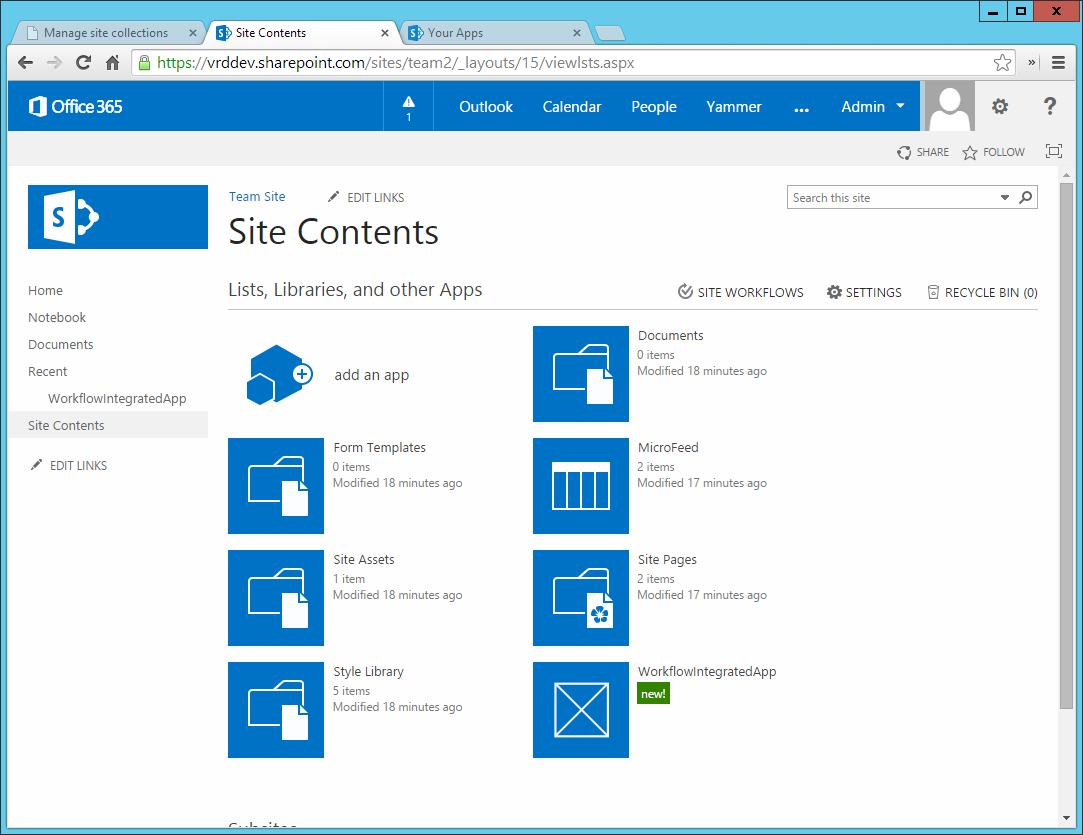
14) Once uploaded, go to your Team Site > Site Contents > Add an App > Select your app and add it to your Team Site.


15) You will be prompted to trust your App. Click on "Trust It".


16) Once the App is installed on your site, go to Site Contents > Site Workflows


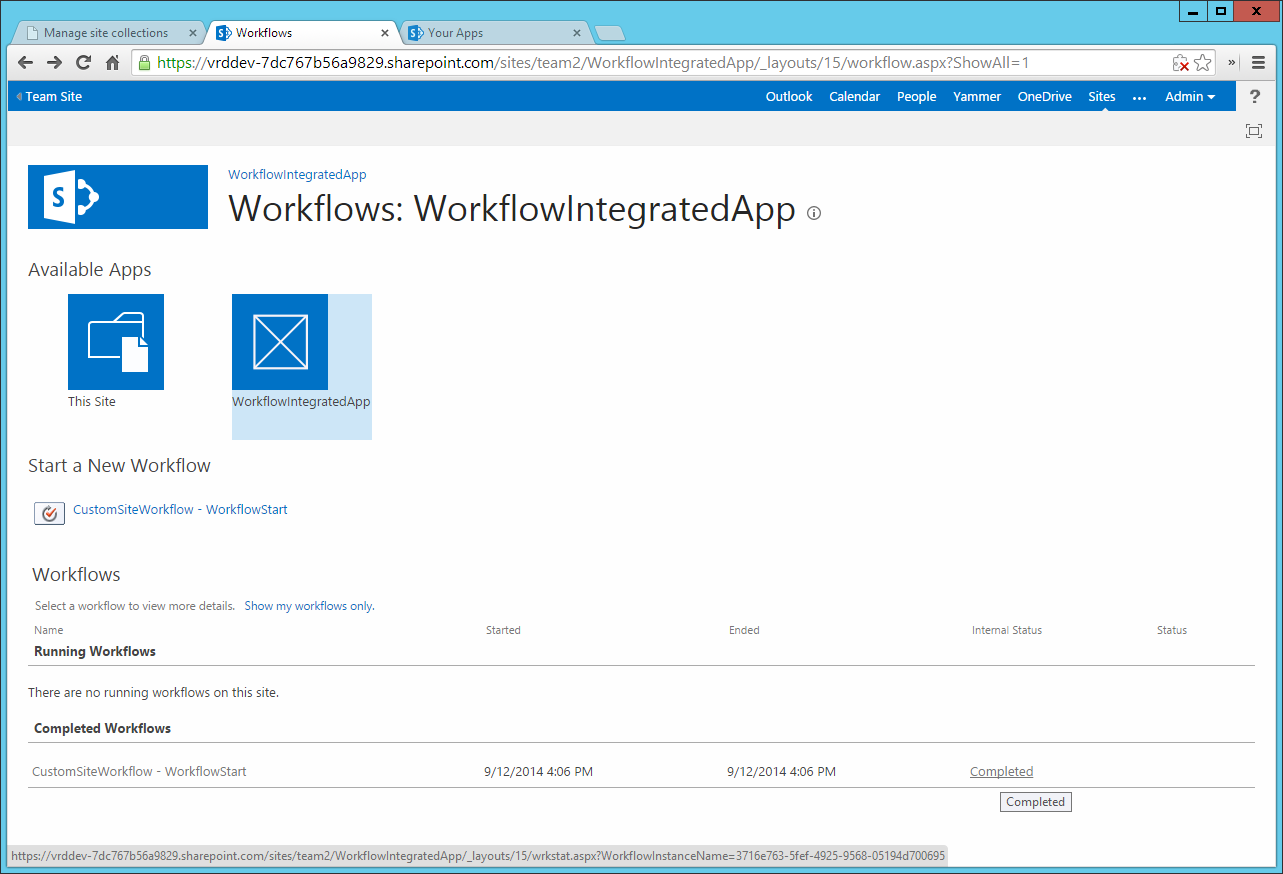
17) Click on your App to see your Site Workflow deployed on the site. Click on the Workflow to start it. 

(Click on the Image to Zoom)

18) Let the workflow complete. After it has completed, click on the Internal Status to see what the workflow logged to the History List 

(Click on the Image to Zoom)

19) You can see that the Workflow logged the url of the Team Site on which it was running. 

(Click on the Image to Zoom)

This proves that the Workflow was deployed to and ran on the Host Web (Content Site).

Deploy List Workflow:


The process to deploy the list workflow is quite the same except in step 5, select List Workflow.  


Do not associate your workflow to any List. We will do the association after the deployment of the Workflow.


Select when you want your workflow to start. 


Add a Sample Workflow Activity in the Workflow to Log the Current List Name and the Current Item Url:


Steps 8 to 15 are the same as for a Site Workflow. After the Workflow is deployed, Go to a list > List Settings > Workflow Settings > Add a Workflow


Click on your App, Associate your Custom Workflow by giving it a name and configuring other settings. Click on OK.  


After you associate the Workflow, Start it either manually, or create an item, or update an item depending on the method you selected in the Workflow Designer in the App. 


After the Workflow Completes, Click on the Internal Status to see what the Workflow Logged to the History List:


Thanks for reading!

Exploring Office Graph and the Graph Query Language

$
0
0
So you must have heard about the Office Delve launch recently. I have been trying out my hands at the Office Graph which powers Delve and the Graph Query Language which can be used to get data from the Office Graph. To get a comprehensive idea of how it all works, follow these links:

Developing Apps against the Office Graph - Part 1
http://blogs.msdn.com/b/richard_dizeregas_blog/archive/2014/09/15/developing-apps-against-the-office-graph.aspx

Developing Apps against the Office Graph – Part 2
http://blogs.msdn.com/b/richard_dizeregas_blog/archive/2014/09/17/developing-apps-against-the-office-graph-part-2.aspx

Using Graph Query Language (GQL) with the SharePoint Online Search REST API to query Office graph:
http://msdn.microsoft.com/en-us/library/office/dn783218(v=office.15).aspx

So basically we can say that the Graph Query Language can be used to filter normal search queries to return content which is highly relevant to the user. I think the most important thing about the GQL is the EdgeWeight property which can be used to return content sorted by it's "closeness"to the user. This 'magic' property will also return a relevance score of how close the object (content) is to the actor (user).

For example, if  I make a query to get all the people with whom the current user closely works with, the person who will have the highest relevance score will be the person with whom the current user works with most closely. The next person will have a slightly lesser relevance score and so on. This will also be true for other queries such as documents which are most relevant to the current user. This data can be very useful and can be used in a variety of scenarios.

Here is an example of a query to get the users with whom the current user works closely. I have modified the code from Richard diZerega's blog which is linked above.

Writing Signals into the Office Graph and Delve

$
0
0
Say you are developing a custom solution in SharePoint Online and you want to integrate data from the Office Graph in it. The method of reading data from the Office Graph is pretty straightforward and I have documented it in my previous post: http://www.vrdmn.com/2014/09/exploring-office-graph-and-graph-query.html

But what if you actually want to send behavior data to the Office Graph? You have a custom link to a User Profile or a document in your solution and when the user clicks the link, you want to send a "Clicked" signal to the Office Graph. If  a User Profile link of a user is clicked, you want to send a signal to increase the "closeness" of the current user to that user.

You want the user's interactions in your solution to affect the data that is stored in the Office Graph.

It is actually possible to push signals into the Office Graph from your custom application. There is actually an endpoint  _api/signalstore/signals to which you can send your custom signals.

Some things to note before we go ahead:

1) This API is not yet documented and might change in the future. It is not recommended for production solutions just as yet. 

2) This API is also throttled at a certain stage to avoid malicious use to provide false data to the Office Graph.

To see how this is done, you can open up Delve in your browser and press F12 to bring up the Developer Tools. When you navigate in various areas of Delve, you can see all the signals which are sent to the Office Graph as a result of your actions. For example, when you click a document, you can see the following request is sent:

(click to zoom)

Each signal is made of 3 properties. The Action, the Actor and the Item.

1) Actor: This is always the current user as you cannot send signals on behalf of other users.

2) Item: This is the object against which the signal is performed. This can be a document url in case of a document or it can be the login name of a user if the object is a user.

3) Action: This is the action e.g. Clicked, Shown or Elevate which is used to affect the relationship between the Actor and the Item.

I have put together couple of code samples which could be used as a base in sending custom signals to the Office Graph.

1) Send a document "Clicked" signal. This will tell the Office Graph that the current user has clicked a particular document. The Office Graph will take into account this action when calculating the closeness of the current user to this document.


2) Elevate a user with respect to the current user. This will increase the closeness and edge weight of the specified user with respect to the current user:


Hope this API will get documented soon. There is a lot of potential here for building custom solutions on top of the Office Graph and Delve.

Set another user's profile properties with CSOM

$
0
0
So a while ago, writing User Profile properties via the CSOM was made possible. Vesa Juvonen has a great post about it here:

http://blogs.msdn.com/b/vesku/archive/2014/11/07/sharepoint-user-profile-properties-now-writable-with-csom.aspx

I have put together some code which will allow a Tenant Administrator to modify the User Profile Properties of another user in the tenant. This could be useful if a batch job has to be performed and profile properties have to be set (or updated) for all the users in a Tenant. The code is only to set the properties of one user but you can easily modify it to do the same for multiple users.

This code can also be found as a part of the Office 365 Patterns and Practices code samples on GitHub:
https://github.com/OfficeDev/PnP/tree/dev/Samples/UserProfile.Manipulation.CSOM.Console/

You will need the AccountName of the user whose profile properties you want to modify.  To get the AccountName of all the user's in a Tenant, you can use People search.

Some points to note with this approach:

1) You need to know the credentials of the Tenant Admin

2) I have tried using this code in a Provider Hosted App with App Only Policy but it does not seem to work. It only works in a Console Application for now.

3) This is only available in SharePoint Online for now and not SharePoint 2013 On-Premises.

4) You will need the 16.0.0.0 version of the following libraries:
 Microsoft.SharePoint.Client.dll
 Microsoft.SharePoint.Client.Runtime.dll
 Microsoft.SharePoint.Client.UserProfiles.dll

The code:

1) Set Single Value Profile Property of another user:


2) Set Multiple Value Profile Property of another user:


My Colleagues App powered by Office Graph

$
0
0
This will be a very short post following one of my previous posts about the Office Graph and the GQL. I have taken most of the code there and put it inside a SharePoint Hosted App.

The App queries the Office Graph for the colleagues with whom you closely work with and displays them. Basically, it does the same thing which you see on the left hand side when you log in to Delve. This app can be a good starting point if you want to further develop apps which consume the Office Graph API. You can pick and choose the Delve elements which you want in your app. Also, you can create customized scenarios which leverage the Office Graph and deliver them as Apps for SharePoint.

Since the App requires Search permissions to be granted in the AppManifest, you will need to have the Tenant Admin credentials to install the App. I think this might be a blocker for some people in installing the App. Now fortunately, if you just want to test the functionality out, you can take all the code in the App.js and run it from inside a SharePoint Online page. You do not need tenant admin permissions to execute the code in the page.

This App will only work in SharePoint Online (Office 365) as there is no Office Graph for SharePoint On-Premises at the moment.

The code for the App is part of Office Developer Patterns and Practices repository and is available here:

https://github.com/OfficeDev/PnP/tree/dev/Samples/OfficeGraph.Demo.App

Programmatically add a document to a Delve Board with REST

$
0
0
Microsoft recently launched the Boards feature in Delve, with which you can create Pinterest like boards and add content to them. You can add documents from your SharePoint sites as well as OneDrive for Business sites.  Here is a great introduction to the functionality: http://blogs.office.com/2015/01/07/introducing-boards-office-delve-new-way-organize-share-work/ 
I have been playing around a bit with this feature and have some interesting things to share. So Lets have a look at how this has been implemented under the hood.

1) The same Signals API which I have blogged about here is used in boards. AJAX requests are sent to the /_api/signalstore/signals endpoint when any operations are made in Delve (eg. add document to board)

2) Boards are internally referred to as "Tags". So when you add a document to a board, it gets "Tagged" with the name of the board. More on this later.

3) There seem to be 2 components in play. When you add a document to board, there is an "immediate" add in the front-end as well as a normal add when the incremental crawl adds the document in the Search Index. The front-end immediately  shows the user  that the document is added to a board. This is a very good solution as otherwise the user would have to wait till the incremental crawl has taken place.

Let us have a look at the API now. All the API is doing is adding/removing documents to boards and following/unfollowing boards. Unlike my previous post about modifying relationship signals in the Office Graph, with this API you will not be interfering with your Office Graph relationships so I think you can safely use this API in your solutions.  Now lets take a look at what actually happens under the hood:


There is a new button introduced in the document card. So when you click on "Add to Board" and select a board from the dropdown,  here is the JSON which is sent to the Signals API: 

(click to zoom)


Basically, it has 2 Important pieces of data: 

1) The document gets tagged with the name of the board. This tag is then used by Delve to search and get all documents belonging to a certain board. This is done by the first object with ActionType:Tag and Item Id as the absolute url of the document.

2) The current user is made to follow the Tag (which is the board name) so that it shows up on the left hand side in Delve. This is done by the second object with ActionType: Follow and Item Id:‘Path=”TAG://PUBLIC/?NAME=MY+TEST+BOARD”  where the name of the board I selected was "My Test Board"

If you want to reproduce this exact behavior in your solution, here is the sample code you can start with. Please be aware that that this code only tags the document with the board name so that it is added to the search index and follows the board so that it appears in your boards in Delve. This does not do the front-end add to the board. So you will have to wait for an incremental crawl to run in Office 365 for the document to get added to the board and show up in Delve. I have observed this can take anywhere from 5 to 30 minutes. 

Here is the code:


The document will get added to the board:


Hope you enjoyed this post. I have plans to follow this up with some code samples which show how to remove documents from boards, unfollow boards and some other new functionality. Thanks for reading.

Get all Office 365 Video Channels, Groups and Delve Boards with REST

$
0
0
Office 365 has introduced 3 new portals recently: Videos, Groups and Delve. Behind the scenes, the architecture of Videos and Groups is such that each Video channel is a site collection and so is each Group. For Delve boards, each board is saved as a Tag and when you add a document to a board, the document is tagged with the name of the board.

If you are working on a solution for Office 365 and want to integrate Videos, Groups or Delve, here is how you can get a list of all of them using the SharePoint REST API:

1) Get all Office 365 Video Channels with REST API:


https://siteurl.sharepoint.com/_api/search/query?querytext='contentclass:sts_site WebTemplate:POINTPUBLISHINGTOPIC'&SelectProperties='WebTemplate,Title,Path'&rowlimit=50


2) Get all Office 365 Groups with REST API:


https://siteurl.sharepoint.com/_api/search/query?querytext='contentclass:sts_site WebTemplate:Group'&SelectProperties='WebTemplate,Title,Path'&rowlimit=50


3) Get all Delve Boards with REST API:


https://siteurl.sharepoint.com/_api/search/query?querytext='(Path:"TAG://PUBLIC/?NAME=*")'&Properties='IncludeExternalContent:true'&selectproperties='Path,Title'&rowlimit=50

Get all documents from an Office 365 Group with REST

$
0
0
In my previous post, we saw how you can get a list of all the groups in your Office 365 portal with the REST API. Now, if you are building a solution on top of the Office 365 platform and want a list of all the documents in a particular Office 365 Group, you can get them using the REST API.

As discussed in my previous post, each group is underpinned by a separate site collection in SharePoint Online. When you upload a document to a group, it gets uploaded in the "Documents" library of the root web of that site collection. So you can use the REST API to get all sorts of information about the group including the list of documents. 

Here is a test group called "Technical Team" I have created in Office 365 for the purpose of this post. I have also uploaded 2 documents to it:


In order to get the list of documents in the group, we need to make a REST call to the SharePoint Search REST API:

_api/search/query?querytext='SiteTitle:"Technical Team" AND ContentTypeId:0x0101007DB6FD427B6228409ED888DF766B27C9'&selectproperties='Title,Path,SiteTitle'

The ContentTypeId is the id of the content type which is associated to the document when a document is uploaded to an Office 365 group.

Here is the complete code. I have used JavaScript and the jQuery.ajax function to make calls to the SharePoint REST API. But you can use a variety of other options like the JSOM, CSOM or even the Office 365 APIs. Since all the groups are by default open to users in the tenant, there should not be major challenges to authentication around this. I haven't tested the code for these APIs myself. 


And the logs in my Dev tools console:


Thanks for reading!

Get all videos from an Office 365 Video Channel with REST

$
0
0
In my previous post, we saw how you can get a list of all the video channels in your Office 365 portal with the REST API. In this post, we will see how to get a list of all the videos in a particular Office 365 Video Channel with the SharePoint REST API.

Each video channel is underpinned by a separate site collection in SharePoint Online. When you upload a video to a channel, it gets uploaded in the "Videos" library of the root web of that site collection. A copy of the video is sent to Azure Media Services which then transcodes it so that it can be played from a number of devices. Since the video is stored in SharePoint Online, the size of the video counts against your Tenant storage.

Since each video channel is a site collection, you can use the REST API to get all sorts of information about the channel including the list of videos.

So this is a channel called "Development" on my Office 365 Video Portal. You can see that there are 3 videos uploaded to this channel:


In order to get the list of videos in a video channel, we need to make a REST call to the SharePoint Search REST API:

_api/search/query?querytext='SiteTitle:"Development" AND ContentTypeId:0x010100F3754F12A9B6490D9622A01FE9D8F01200F9B0E79C5EBC0545B80F5F1B3985E159'&selectproperties='Path,Title,SiteTitle'

The ContentTypeId is the id of the new "Cloud Video" content type and the SiteTitle will be the name of the Channel.

Here is the complete code. I have used JavaScript and the jQuery.ajax function to make calls to the SharePoint REST API. But you can use a variety of other options like the JSOM, CSOM or even the Office 365 APIs. Since all the channels are by default open to users in the tenant, there should not be any major challenges to authentication around this. I haven't tested the code for these APIs myself.


And the logs in my Dev tools console:


Thanks for reading!

Programmatically Follow or Unfollow a Delve Board with the REST API

$
0
0
In one of my previous posts, we saw how you can programmatically add a document to a Delve Board with the REST API. This is a follow up post to that in which we will see how to Follow or Unfollow a Delve board with the REST API. If you haven't already seen the previous article, I suggest you take a look at it because it explains how Delve works under the hood and how you can integrate Delve into your custom Office 365 solutions.

Please bear in mind that since Delve utilizes search internally, you will have to wait for a search crawl to take place in Office 365 before you can see results of the REST operation.

I have used JavaScript and the jQuery.ajax function to make calls to the Signals API. But you can use a variety of other options which support REST.

So without much further ado, here is the code to follow or unfollow a board in Delve:


Glimpse of the upcoming Office 365 Video API

$
0
0
A while ago, I wrote a post about getting all the video channels and videos from the Office 365 Video Service.  Shortly after that I got a word from Microsoft that there is going to be a public API for accessing Office 365 Videos. I was allowed to share the information as long as I mentioned that the API is not documented yet and is still being worked upon. So there is a possibility that it might change in the future so it is advised that this should not be used in production until it is fully stable and documented.

Here is how the API will work:

1) Get the right path from the discover endpoint:


https://site.sharepoint.com/sites/team/_api/VideoService.discover

The returned JSON will contain the following values among others:

{
    "IsVideoPortalEnabled": true,
    "VideoPortalUrl": "https://site.sharepoint.com/portals/hub"
}

IsVideoPortalEnabled will be true if your tenant has got Office 365 Video and VideoPortalUrl is the url which we will use to make further REST calls.

2) Get all Video channels with the VideoPortalUrl:


https://site.sharepoint.com/portals/hub/_api/VideoService/Channels

The returned JSON will contain all the channels with their unique GUIDs:

{
            "Description": "",
            "Id": "eaa748d7-97d6-43f1-8780-ce5c8acbf2bb",
            "TileHtmlColor": "#0072c6",
            "Title": "Development"
}

3) Get all videos from a single video channel:


Here, we will use the Id obtained from the previous call to get all the videos from a particular channel:

https://site.sharepoint.com/portals/hub/_api/VideoService/Channels('eaa748d7-97d6-43f1-8780-ce5c8acbf2bb')/Videos

Set user profile properties using JSOM & JavaScript

$
0
0
User Profile properties were recently made writable from the CSOM. Vesa Juvonen has a great post about it here . In addition to that, I have also blogged about how a Tenant admin can set the user profile properties of the users in the tenant.

In this post, I will show you how to set the current user's profile properties using the JavaScript Client Object Model (JSOM). Please refer to the 2 posts I have mentioned for any additional details around this.

Right now this functionality is only available in SharePoint Online/Office 365. If you want this functionality to come to SharePoint 2013 On-Premises, please create or up-vote on the feedback here: https://officespdev.uservoice.com/


Custom Taxonomy Picker for Provider Hosted Apps

$
0
0
When working with SharePoint Online or developing cloud friendly solutions, it can be tricky to replicate some functionality which is easily available on-premises. We had a scenario recently where the user should be able to set values for a Managed Metadata user profile property. Now if this was a farm solution, we could have used a variety of methods like User Controls, Taxonomy Pickers etc. But since this was a Provider Hosted App, all those options were not available to us.

I knew that the Office Dev Patterns and Practices project has a cloud friendly taxonomy picker but that did not fit our requirements. It requires the creation of an App web in which sense it is not a "pure" provider hosted app. Also, there were some specific requirements around styling and business logic which meant that a custom Taxonomy Picker was the only way forward.

GitHub link for this project:
https://github.com/vman/CustomTaxonomyPicker

So without much further ado, here is how the custom User Profile property taxonomy picker looks:

1) When loaded first on a page, it gets the values from the "Skills" user profile property and displays them as tags:


2) When you start typing into the input box, the auto-complete suggestions are based on the "Keywords" termset. (You can change this to get terms from another termset)


3) When you are happy with the values, click on update and your Skills user profile property will be updated with the selected values:


And that's basically how it works from an end user perspective.

Advantages:


1)  Pure provider hosted app. No App web required.  If you are on-prem and in a big enterprise, this means that you don't have to wait for a wild card DNS entry to be setup. We all know how long that can take. This can be implemented as a pure provider hosted app because all calls to SharePoint are made by using CSOM in an MVC controller.

2) Complete control. Can be customized anyway you want. If you have specific business logic which needs to manipulate data before sending it to SharePoint, then you are easily able to do so.

3) Customisable UI: The jQuery Tag-It plugin is used in this taxonomy picker. It supports jQuery ui themes and a whole lot of other styling options. More about this in the Technical details section below.

Limitations:


1) As is, this control only works with SharePoint Online/Office 365. This is because the API for writing user profile properties is not yet available for SharePoint On-Premises. But if you are up for it, you can use the UserProfileService.asmx for accomplishing the same functionality. Check out this sample to see how to do it:
https://github.com/OfficeDev/PnP/tree/master/Samples/Core.UserProfilePropertyUpdater

2) At this time, it can only be used with user profile properties. If this has to work with Taxonomy fields in a list, you will have to modify the code but the principles behind the approach would stay the same.

But hey, the source is on GitHub so you don't get to complain! Submit a pull request and I will be happy to merge it :)

Technical Details:


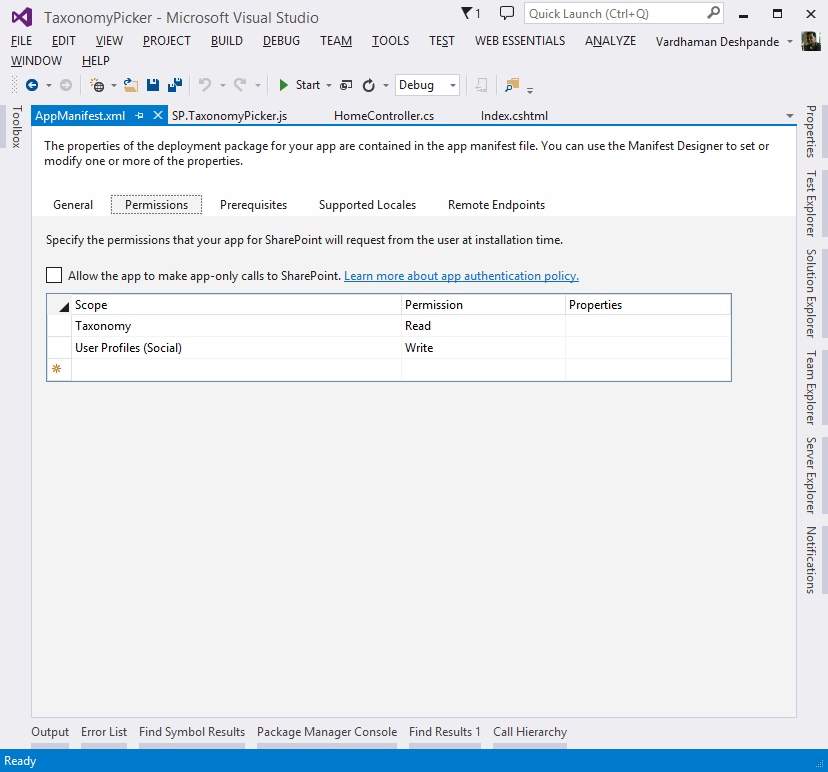
1) Permissions:


Since the app interacts with the Managed Metadata Service and writes to the User Profile Service, the following permissions are needed:


2) jQuery Tag-It plugin:


The completely awesome jQuery Tag-It plugin is used to present the terms as tags in the UI. It provides a wide variety of options for selecting tags. It accepts a JavaScript array of values to show auto-complete suggestions.  Check out the plugin home page for more details.

3) Get current user's skills:


When the page loads, we need to get the skills for the current user to show them by default in the control, this can be done by making a simple call to the UserProfile Service.


4) Get terms from the Keywords termset:


To show the auto-complete suggestions, the Tag-It plugin requires a JavaScript array of values. We will use a MVC controller to get the keywords from the Managed Metadata Service and pass the values as a JavaScript array to the plugin. You can use any other termset to get your values. It would also be a good idea to cache these values in the browser localStorage so you don't have to make a call to the Managed Metadata service every time the control loads.


5) Update current user's skills:

When the Update button is clicked, another call is made to the Skills MVC controller which uses the recently released user profile write methods from CSOM. More about them on Vesa Juvonen's blog:
http://blogs.msdn.com/b/vesku/archive/2014/11/07/sharepoint-user-profile-properties-now-writable-with-csom.aspx

If you are on-premises, you can still use the UserProfileService.asmx for that. See this Office Dev PnP sample:
https://github.com/OfficeDev/PnP/tree/master/Samples/Core.UserProfilePropertyUpdater

Thanks for reading! Hope you found this useful.

CSOM tip for making your code flexible

$
0
0
We all know that in CSOM, for any given object, we can specify certain properties to be brought back from the server. Something like this:

This will only bring back the Title property of the web thus reducing data traveling over the wire.

Now in this case, the second parameter of the clientContext.Load method is an object of type Expression<Func<Web, object>>[]

This is an array of Linq expressions which can be utilized to our benefit. We can convert that array into a parameter which can be passed to a "Utility" function. This function will only get the properties specified in that array. Like this:

Then, that function can be called with different parameters depending on the properties we want to fetch from the server for that particular instance. For example:

Only get the Title and Id of the Web:

Only get the MasterUrl and the CustomMasterUrl of the web:

For both the above calls, we are not changing the GetWebDetails function. It will always return a Web object with the specified properties filled in. It will also reduce data travelling over the wire, as only the specified properties will be fetched. Thus, making your code more flexible and performance friendly.

You can also have other utility functions for Lists, Users etc. Here is a similar function for Lists:

Hope you find this useful!

Add a Site Collection administrator to all Site Collections in a Tenant

$
0
0
I have come across this scenario many times where even if I am the tenant admin in my SharePoint Online tenant, it is not necessary that I will be the site collection admin of every site collection by default. This is by design and makes perfect sense as there might be some site collections where sensitive data might be stored and I might not have rights to see that data despite being the tenant admin. However, in some scenarios you might feel the need to give a user site collection admin rights for all the site collections in the tenant.

Also for OneDrive for Business site collections in the tenant, the user who is owner of the site collection is the only person who has site collection admin rights on it by default. This can be a problem for compliance and e-discovery reasons. You might be in a situation where you need to give site collection admin rights to a compliance manager or a global administrator on all the user's OneDrive for Business sites.

In this post, lets have a look at how you can make a user a site collection admin on all the site collections in a tenant as well as on all the OneDrive for Business site collections in the tenant.

Some notes:

1) For now, this only works with SharePoint Online/Office 365.
2) You will need the SharePoint Online Client Side Object Model Nuget package
3) By changing a parameter in the SetSiteAdmin function, you can also remove a user from the site collection admins of all site collections.
4) The user who runs this code will need Tenant Administrator rights on the Tenant.

1) Add a site collection admin to all site collections in a tenant:


This is the easy part, all you need to do it get the urls of the site collections in the tenant and add the desired user as a site collection admin to it using the Tenant.SetSiteAdmin function.


2) Add a site collection admin to all the OneDrive for Business site collections in a tenant:


This takes a bit more work. Here are all the things we need to do:

1) Get the account names of the users in a tenant using People Search. Now bear in mind that search has a limitation of returning a maximum of 500 rows on SharePoint Online. That will be 500 users in our case. So if your tenant as more than 500 users, you will need to call search in batches of 500 to get the account names of all the users.

2) Once we have the account names of the users, we need to get the url of their OneDrive for Business sites. We can do this by querying the CSOM UserProfile API

3) After getting the OneDrive for Business site urls, all we need to do is use the same Tenant.SetSiteAdmin function as above.

Here is the complete code for that:


There is also another way to do the same thing where you get the OneDrive for Business site urls from the UserProfileService.asmx and then use the Set-SPOUser SharePoint Online PowerShell cmdlet to set the user as the site collection admin. Here are the details for that https://technet.microsoft.com/en-us/library/dn765092.aspx

Hope you found this article useful!

Getting started with the Office 365 Unified API

$
0
0
The Office 365 Unified API was recently launched at Build 2015. It uses Azure AD for authentication and has just one endpoint "graph.microsoft.com" which can be used to query for data from any service across Office 365.

This is a very important thing according to me because in the earlier versions of this API we had to query a discovery service and get the URL of the individual service (SharePoint, Outlook, Azure AD etc.) from which we wanted to get the data.  With the new unified endpoint, it becomes easier for us Developers to just query a single endpoint for data from any of the services across Office 365.

Complete information about the Office 365 Unified API can be found here: https://msdn.microsoft.com/office/office365/HowTo/get-started-with-office-365-unified-api

I decided to try my hand at the .NET Client Library of the Office 365 Unified API. Here is the complete code for my console application: https://github.com/vman/Office365UnifiedConsoleApp

1) The very first thing you will need to do is register your application in Azure AD and get the client id. You can think of this as being somewhat similar to registering an App Principal for a SharePoint App (Add-In as it's now called).


For my test app, I have registered a Native Application (as opposed to a Web Application) mostly because the process for a native application is a bit simpler. For a Web Application, you also need a client secret along with the client id. I decided to keep things simple for my first console app.

2) When you register your app to Azure AD, do not forget to grant the appropriate permissions in the "permissions to other applications" 

3) Make a note of your client Id. You will require this in your code:

4) Create a new Console Application Project in Visual Studio and add the following NuGet packages to it:

Active Directory Authentication Library 2.14.201151115

Office 365 unified API client library (preview) 0.2.6-rc

5) Now you are set up to write code against the Office 365 Unified API.

The very first thing you will need to do is get the access token from Azure AD. Once you have the access token,  all you need to do is create an object of the GraphService class and use it to get data from Office 365 provided you have the right permissions set up in Azure AD.

Here is my sample console application code:


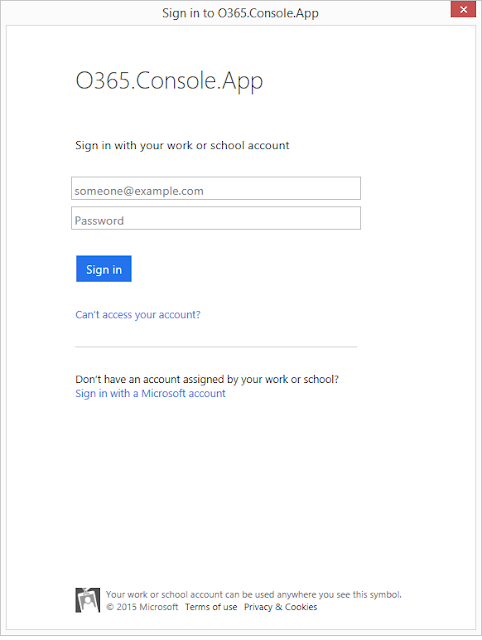
Once you run this code, you will get a prompt to enter your Office 365 credentials:


Once you enter the right credentials, the access token will be fetched and passed on to the GraphService client object which will then use it to get the current user from the GraphService.Me property and display it on the console.

Hope you enjoyed reading this as much as I enjoyed fiddling around with this new API :)


Using the Office 365 Unified API in ASP.NET MVC

$
0
0
In my previous post, I wrote about Getting started with the Office 365 Unified API. In that post, I introduced the new Office 365 Unified API and created a basic console application which used Azure AD for authentication and consumed the Office 365 Unified API. But chances are that a console application is not going to be a solution to most of your business needs. That is why, in this post we will see how the Office 365 Unified API can be used in an ASP.NET MVC application.

The complete code for this blog post is available on GitHub: https://github.com/vman/O365UnifiedAPIMVC

Full credit to Jason Johnston's article Getting Started with the Outlook Mail API and ASP.NET on which I have based my code.

The Authentication flow:


Since the Office 365 Unified API uses Azure AD for authentication, these are the basic steps to get your application authenticated:

1) Request an authorization code

2) Request an access token based on the authorization code. (when you successfully make this request, you also get back the refresh token along with the access token)

3) Make a request to the desired resource e.g. "https://graph.microsoft.com/beta/myOrganization/users" using the access token.

4) When the access token expires, use the refresh token to get a new access token instead of going through the entire authentication flow again.

See the following links for more details on the Office 365 Unified API and the Azure AD authentication flow:

Authorization Code Grant Flow

Office 365 Unified REST API authentication flow

Register your application in Azure AD:


Now let's get started on how to actually go through this process in an MVC application.

As mentioned in my previous post, the very first thing you need to do is register your application in Azure AD. Here are the steps to do that:

https://msdn.microsoft.com/office/office365/HowTo/get-started-with-office-365-unified-api#msg_register_app

I have registered a Web Application in this case and here are the permissions I have granted:


Windows Azure Active Directory:
  • Access your Organization's Directory

Office 365 unified API (preview): 
  • Read and write all users' full profiles
  • Access directory as the signed in user
  • Enable sign-in and read user profile

If the Office 365 unified API (preview) application is not available by default, click on "add application" and add it.

After you register your application, copy the ClientID and the ClientSecret in the web.config file of your MVC application.

<configuration>
  <appSettings>
    <addkey="ida:ClientID"value="your client id" />
    <addkey="ida:ClientSecret"value="your client secret" />
  </appSettings>
</configuration>

Now that the application is successfully registered in Azure AD, we can go ahead and write the code for the authentication flow in our MVC app.

The ASP.NET MVC Application:


The first thing you need to do now is to get the following NuGet package installed in your project:

Active Directory Authentication Library 2.14.201151115

Alright, we are finally ready to write some code now :)

In your MVC Controller, create an action called SignIn. We will use this action to redirect the application to the Azure AD Authorization Request Url:


This will take the application to the Azure AD login page where the user will have to enter his/her credentials. Once the credentials are successfully authenticated, the application will be taken to the redirectUrl mentioned in the code. This redirectUrl is a url to another Action in our MVC app. At this time, the url will also contain the Authorization code mentioned in step 1 and 2 above.

The Authorize action mentioned in the redirectUrl looks like this:


This will get the Authentication code from the request parameters. Based on the Authentication code, it will make a call to Azure AD to get the Access token. Once we get the Access token, we will store it in the session so that we can use it for multiple requests.

A production level solution will probably need a better mechanism to store the Access token. Andrew Connell has written a great article on storing the access token in a database. See the article here:

Azure AD & ASP.NET MVC - Walk-Through Implementing ADAL & OWIN

Now that we have a valid Access token, we are ready to actually make a call to the Office 365 Unified API resource to get data. I have used a simple HttpClient to make the REST call

Once the call is successful, you get JSON back which then you are free to mangle in your code.


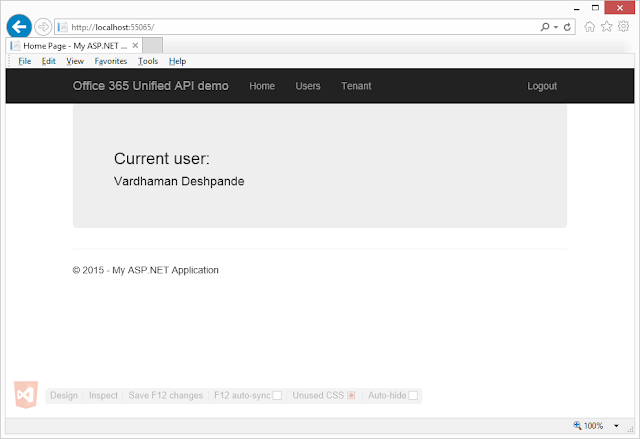
In my sample application, I have also written calls for getting all the users from the tenant and the tenant details. Check it out here: https://github.com/vman/O365UnifiedAPIMVC

Additional Reading/Fiddling:


Here is the complete list of REST calls you can currently make using the Office 365 Unified API:

Office 365 unified API reference (preview)

Also, if you want to try out REST API without actually writing any code, this is a great tool which can help you make calls and see the response: http://graphexplorer2.azurewebsites.net/

Only thing is you will need credentials to install the application in your Azure Tenant.

Hope you found this post useful!
Viewing all 134 articles
Browse latest View live