Quantcast
Channel: Vardhaman Deshpande
Viewing all 134 articles
Browse latest View live

Get all Suspended or Terminated Workflow instances in SharePoint Online


SharePoint Framework: Org Chart web part using Office UI Fabric, React and OData batching

$
0
0
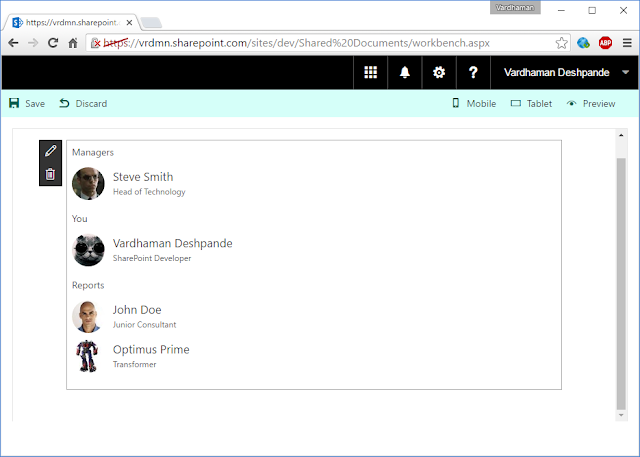
Here is a SharePoint Framework web part I have put together to show an organisation chart for the current user: 

Code is available on GitHub as always: https://github.com/vman/SPFx-Org-Chart


(click to zoom)

1) For getting the Manager and the Reports of the current user, the ExtendedManagers and DirectReports user profile properties are used.


2) Uses the OrgChart CSS directly from the Office UI Fabric: http://dev.office.com/fabric/OrgChart (Not the Office UI Fabric React components which are still in progress)


The Office UI Fabric CSS is bundled together with the web part and not referenced externally. In the OrganisationChart.module.scss:

Thanks to my colleague and buddy Paul Ryan for this tip.

3) The REST API calls are made with the HttpClient belonging to the current ServiceScope. No need to pass web part properties or the web part context. 


4) The Managers and DirectReports are fetched by registering a mapping of the UserProfileService class in the current ServiceScope


5) OData Batching is used to get details (Photos, Titles, Profile Urls) of all DirectReports in a single call. (Similarly, if more than one Manager exists in the ExtentedManagers property, details of all users are fetched in a single batch call)


More on OData Batching in my previous post: Batch REST requests in SPFx using the ODataBatch preview

Hope you find this useful!

Working with the CSOM External Sharing API in SharePoint Online

$
0
0
I was recently working on a SharePoint Online project where we had quite a heavy use of the External Sharing CSOM API.

Here are some utility functions I have put together which might be useful in the future.

I have used the SharePoint Online CSOM version 16.1.5626.1200 for this:
https://www.nuget.org/packages/Microsoft.SharePointOnline.CSOM/16.1.5626.1200/

Also, there are some really nice samples in SharePoint Patterns and Practices (PnP) around External Sharing

1) Site Collection External Sharing

2) External Sharing Expiration Service

In my case however, I have used the native CSOM API methods for creating the utility functions.

1) Get Externally Shared Documents


This method uses search to get all documents which are externally shared. You can modify the search query to filter by site, site collection, document library etc.


2) Get external users for a document


This method uses the native CSOM API to get all the users with whom a particular document is shared.


3) Get all external users in a Site Collection:


4) Get all external users in a Tenant:


Hope this helps!

Introducing: SharePoint Online Public CDN Manager

$
0
0
The Office 365 Public CDN Developer Preview was recently announced which allows static assets like images, JavaScript, CSS etc. to be hosted in a globally available CDN. Find out more about it here.

With the Office 365 Public CDN Developer Preview, the Office 365 PowerShell and SharePoint Online CSOM was also updated with APIs which could be used to manage the Public CDN.

Although the APIs were handy, what was missing was a nice and simple GUI to manage the CDN settings. So I set out to create an Add-In which would give a nice overview of all the CDN settings including folders in the tenant which have been configured as Origins, filetypes which have been set to be pushed to the CDN and finally a way to enable/disable the CDN.

Introducing the SharePoint Online Public CDN Manager:


Checkout the code on GitHub: https://github.com/vman/SPO-CDN-Manager


As you can tell, the SharePoint Online Public CDN Manager can be used to:

1) Add/Remove CDN Origins i.e. SPO Libraries which will be used to store static assets.

2) Add/Remove Filetypes. Which files will be pushed to the CDN.

3) Enable/Disable the CDN on a tenant.

The Implementation:


1) It is a Provider Hosted Add-In which uses the SharePoint Online CSOM to talk to SharePoint. The October 2016 Release of SPO CSOM is used:
https://dev.office.com/blogs/new-sharepoint-csom-version-released-for-Office-365-october-2016

2) For the UI, the Office UI Fabric core styles are used together with the Office UI Fabric JS Components


3) The Add-In requires Full Control permissions on the tenant. This is because the CDN is a tenant wide setting and can be modified only by Tenant Administrators or SharePoint Administrators.


The Add-In uses User + App authentication for every call to SharePoint so that only Tenant/SharePoint Administrators can access the CDN Properties:

So even if a user who is not an Admin lands on the page, they are not able to fiddle with the CDN settings.

Tenant vs Office365Tenant


Something interesting I came across while working on this. There are 2 classes available in CSOM now to manipulate tenant settings:

Microsoft.Online.SharePoint.TenantManagement.Office365Tenant

Microsoft.Online.SharePoint.TenantAdministration.Tenant

Both these classes have the Public CDN properties which can be used to manage the CDN. But the interesting this is that the Tenant class requires the Tenant Administration Url (https://yourtenant-admin.sharepoint.com) to instantiate but the Office365Tenant class can be instantiated by a regular site url in SharePoint Online. (https://yourtenant.sharepoint.com/sites/publishing)

If a regular SharePoint site url is used to instantiate the Tenant class, you get an exception saying:

Current site is not a tenant administration site.

This is why I have used the Office365Tenant class. Checkout the code on GitHub for more details.

Workaround for Internet Explorer "Quirks":


The SPO CDN Manager has been tested on latest version of Chrome, Edge and IE. It works without any issues on Chrome and Edge.

But, to get it working on IE, you will have to add the remote site where you provider hosted Add-In is deployed to IE's trusted sites. In my case, I have deployed the Add-In to an Azure Web App so I had to add https://spocdnmanager.azurewebsites.net to IE's trusted sites.

Thanks for reading! Hope you find the SPO CDN Manager useful.

Working with the REST API in SharePoint Framework (SPFx) RC0

$
0
0
The SharePoint Framework Release Candidate 0 (RC0) was released recently which had some breaking changes compared to the previous drops. You can see the release notes here: https://github.com/SharePoint/sp-dev-docs/wiki/Release-Notes-RC0

One of these changes was how REST requests are handled when talking to SharePoint. Lets have a look at what changed and also see some code samples I created when tinkering around with the latest changes.

Before that, you should know that I have also updated my previous SPFx REST API related posts for RC0. If you are interested, you can have a look here:

Batch REST requests in SharePoint Framework (SPFx) using SPHttpClientBatch

Making a POST request to SharePoint from an SPFx webpart

1) SPHttpClient, SPHttpClientConfiguration and the '@microsoft/sp-http' package


The HttpContext and all REST API related operations are now part of the @microsoft/sp-http package.

There is a new class SPHttpClient which has inbuilt get and post methods which make it really easy to query SharePoint. The methods automatically add headers such as ODataVersion and Reqest Digest which are needed when making a REST call to SharePoint.

The SPHttpClientConfiguration class can be used to either let default headers be set on the REST request or it also allows you to override certain headers if needed. Lets have a look at this:

2) GET requests


Making GET requests to SharePoint is really easy when you specify the SPHttpClientConfiguration as SPHttpClientConfigurations.v1. It sets the following headers to your REST request. You don't have to set any headers manually.

consoleLogging = true;
jsonRequest = true;
jsonResponse = true;
defaultSameOriginCredentials = true;
defaultODataVersion = ODataVersion.v4;
requestDigest = true

First, you will need to import the required modules from the @microsoft/sp-http package as mentioned earlier:

Then use this code to make a GET request to SharePoint. The following code makes 3 different requests to SharePoint. The first one gets the current web, the second one gets the current user from the User Information List and the third one gets the current user properties from the User Profile Service:


3) POST requests


For making a POST request, you have to use the SPHttpClient.post method. I have previously blogged about this for the earlier SPFx drops. I have now updated the same post for RC0. Check it out here: http://www.vrdmn.com/2016/08/making-post-request-to-sharepoint-from.html


4) Calling SharePoint Search REST API with OData Version 3


This is a very interesting change for RC0. With the earlier drops, the default OData Version attached with each SPFx REST request was 4. This caused the calls to the SharePoint Search REST Api to fail and return a "500 Internal Server Error" as the search API would only work with Odata Version 3.0.

The issue is discussed on GitHub SPFx repo here: https://github.com/SharePoint/sp-dev-docs/issues/44

As a result of that, SPFx now provides you a way to override the default headers sent with the REST request:

Thanks for reading! All the code for this, as always, is on GitHub: https://github.com/vman/SPFx-REST-Operations

Send emails to authenticated external users using CSOM

$
0
0
Here is some quick code I put together to send emails in SharePoint Online to external users who have accepted sharing invitations and signed in as authenticated users.

Before having look at the code, I should mention my site collection has external sharing turned on and the "Allow external users who accept sharing invitations and sign in as authenticated users" option selected.


And here is the code:


Thanks for reading!

Create/Update SharePoint list items with REST without the '__metadata' property

$
0
0
When updating list items in SharePoint with the REST API, we need to know the ListItemEntityTypeFullName of the list item we are planning to update. There are some good examples on MSDN regarding this https://msdn.microsoft.com/en-us/library/office/dn292552.aspx

The ListItemEntityTypeFullName property (SP.Data.ProjectPolicyItemListItem in the previous example) is especially important if you want to create and update list items. This value must be passed as the type property in the metadata that you pass in the body of the HTTP request whenever you create and update list items.

For example, when you want to update list items in a list called "MyCustomList" you need to know the ListItemEntityTypeFullName of the list items before hand. In this case, it will be SP.Data.MyCustomListListItem. Most examples around the internet do this by querying the list first and then getting the ListItemEntityTypeFullName property from it and using that in the call to update the list items.

If you do not specify the ListItemEntityTypeFullName, you get this error
An entry without a type name was found, but no expected type was specified. To allow entries without type information, the expected type must also be specified when the model is specified

The good news is that you only need to use the entity type full name when you are using "application/json;odata=verbose"as your Accept and Content-Type headers.

If you are using "application/json;odata=nometadata" in your Accept and Content-Type headers, then you do not need the ListItemEntityTypeFullName as well.

Here is are a couple of quick gists I have put together to show how we can create and update list items without specifying the ListItemEntityTypeFullName. I should mention I have tested these only in SharePoint Online at the time of this writing:

1) Create list item without specifying ListItemEntityTypeFullName


2) Update list item without specifying ListItemEntityTypeFullName


Using TypeScript async/await to simplify your SharePoint Framework code

$
0
0
I recently learned about the Async/Await functionality in TypeScript and I was really surprised how easily you can simplify your code with it. Using Async/Await, you can get rid of spaghetti code as well as long chains of Promises and callbacks in your asynchronous functions.

The Async/Await functionality has been around since TypeScript 1.7 but back then it was only available for the ES6/ES2016 runtime. Since TypeScript 2.1, async/await works for ES5 and ES3 runtimes as well, which is very good news. I am kicking myself that I did not start using it sooner.

As with anything new I learn, I have tried to apply it to SharePoint as well to see how I can improve my development experience. Turns out using async/await can really make your SharePoint Framework code simpler and more readable. Lets have a look at some examples and compare between using Promises and Async/Await in your code.

Also, an important thing to note is that although I am making comparisons between using Promises and using async/await, ultimately the aync/await code is downleveled to using Promises by the typescript compiler. If the runtime does not have a native Promise object, we should make sure we have the right polyfills available.

The comparison here is more around code readability and conciseness.

All the code I am using is running inside a SharePoint Framework webpart. So, when you see the 'this' keyword in the code, it refers to my SPFx webpart which inherits from the BaseClientSideWebPart class. Since I am calling the code from inside my webpart, I have access to 'this'.

Here is my import statements for the code:


Simple example using Promises and 'then' callbacks:


Same code using async/await:


Here is a slightly more complex example with code which accepts an array of SharePoint login names and uses the batching framework to get the user profile properties of each user in the array.

You will need the IPerson interface for this:


Complex example using Promises and 'then' callbacks:


Same code using async/await:


As you can see, there is significantly less callbacks when using async/await and the code is also a lot more readable.

Hope you found this post useful. Thanks for reading!


Error handling in SharePoint Framework when using Async/Await

$
0
0
This is a quick follow up post to my previous post Using TypeScript async/await to simplify your SharePoint Framework code.

Since publishing my previous post, some folks have asked how would the error handling work when using async/await in SharePoint Framework. So decided to make this short how-to post.

At first glance, it is really straightforward, you essentially have to wrap your code in a try..catch block and the typescript compiler does the rest.

But there is something interesting here. Under the hood, SharePoint Framework uses the fetch API to make http requests. MDN has some great info on the fetch API if you haven't seen it already: https://developer.mozilla.org/en-US/docs/Web/API/Fetch_API

What would be surprising for some (including me) is that the fetch API rejects the promise only when network errors occur. A "404 Not found" is considered as valid response and the Promise is resolved.

E.g. If you make a get request to a SharePoint list which does not exist, the fetch API (and the SharePoint Framework) will actually resolve your Promise.

A fetch() promise will reject with a TypeError when a network error is encountered, although this usually means permission issues or similar — a 404 does not constitute a network error, for example. An accurate check for a successful fetch() would include checking that the promise resolved, then checking that the Response.ok property has a value of true.

https://developer.mozilla.org/en-US/docs/Web/API/Fetch_API/Using_Fetch#Checking_that_the_fetch_was_successful

There has also been some discusson on this on the SharePoint Framewok GitHub repo:
https://github.com/SharePoint/sp-dev-docs/issues/184

This is why, in addition to a try..catch block, you have to also check the Response.ok property of the returned Response. Here is the basic code you need to handle errors when using async/await:


What you can also do is, since the fetch API returns promises, you can use chaining to detect if the Response.ok property is false. Have a look at this post: Handling Failed HTTP Responses With fetch()

Update 6th May 2017: Here is a slightly more complex example where I have built a service with a custom get method which also handles errors for you:

And here is how to consume the service from your SPFx webpart:

Here is the GitHub repository for the service if you are interested:
https://github.com/vman/SPFx-Fetcher


Hope you find this useful!

Getting the current context (SPHttpClient, PageContext) in a SharePoint Framework Service

$
0
0
I have briefly written about building SPFx services (using ServiceScopes) in my previous post, SharePoint Framework: Org Chart web part using Office UI Fabric, React and OData batching

In this post, lets have a more in-depth look at how to actually get the current SharePoint context in your service, without passing it in explicitly.

All the code used in this post is available on GitHub: https://github.com/vman/SPFx-Service-Context-Demo


Building an SPFx service using ServiceScopes:


Suppose you want to create a service which you want to call from multiple SPFx webparts. The idea is that the code of your service should load on the page only once even if multiple web parts using the same service are added to the page. There is already some great information out there on building such kind of service in SPFx so I won't repeat it here. Have a look:

Share data through a SharePoint Framework service

Building shared code in SharePoint Framework - revisited

I myself have been working on building an SPFx service as an npm package and then using it in a webpart:
https://github.com/vman/SPFx-Service

But before you go ahead and start using ServiceScopes to build your SPFx service, have a read through this Tech Note from the SPFx team:
https://github.com/SharePoint/sp-dev-docs/wiki/Tech-Note:-ServiceScope-API

To summarise, it is recommended to consider other alternatives first before using ServiceScopes. Other alternatives include explicitly passing in dependencies like SPHttpClient in the constructor of your service, or if your service has multiple dependencies, then build a class which has all the dependencies as properties and then pass an object of the class to your service's constructor.

While these recommendations would work in some scenarios, they might not be viable in all conditions. If you are building your service as an npm package, passing in the current context every time you want to use the service might be very burdensome. Ideally, your service should be able to determine all the information about the current context on its own. So lets have a look in this post on how do to that.

Quick note before moving ahead: Building library packages in SPFx is currently not available but it is on the roadmap. It would be nice to see the "build a library" option in the SPFx Yeoman generator. The UserVoice link for this request is here: https://sharepoint.uservoice.com/forums/329220-sharepoint-dev-platform/suggestions/19224202-add-support-for-library-packages-in-the-sharepoint

In this post, to keep things simple, I am going to build my service in the same package as my SPFx webpart. The idea is to demonstrate the concept of using ServiceScopes to get the current context. It would work exactly the same if the service was part of a different SPFx package. If you want to have a look at how this works, have a look at my github repo here: https://github.com/vman/SPFx-Service


Getting the current context in an SPFx service:


Now that you have decided to build an SPFx service using ServiceScopes, lets have a look at how to get the current context in your service without passing it in explicitly.

First, you need to build a service which accepts a ServiceScope object in the constructor. This is the only dependency your service will need. Also, you will not need to explicitly pass in this dependency. SharePoint Framework will handle this for you.

Here is my code for the service:

Now lets have a look at what is going on in the code:

First, we are importing the SPHttpClient class from the @microsoft/sp-http package and the PageContext class from the @microsoft/sp-page-context package.

These classes expose their own ServiceKeys, so in the constructor of our service, we are using those keys to grab an instance of these classes. These instances of classes will already be initialised thanks to the ServiceScope.whenFinished and ServiceScope.consume methods. We can then use the instances in the methods of our class.

Using the current web url to initialise PnP-JS-Core :


Just as an example, you could use the initialised PageContext object to get the current web url and pass it to the PnP JS library. This can be useful if you want to get lists in the current web:


Consuming the service:


Now you have built your service, it is time to consume it from your SPFx web part. It is very straightforward, you just have to instantiate an object of your class using the ServiceScope.consume method and your are good to go. I am using async/await just to keep things simple, but using Promise.then will also work here:


Have a look at the complete code in this post here: https://github.com/vman/SPFx-Service-Context-Demo

Thanks for reading! Hope you have found this post helpful.

Authenticating to the Microsoft Graph API in PowerShell

$
0
0
In this post, lets have a look at how we can authenticate to the Microsoft Graph REST API through PowerShell. There are a few examples already available online but either they refer to old endpoints or they present the user with a login prompt to enter a username and password before authentication.

A few other examples ask for a client id to be submitted with the authentication request. You can get this client id when you register a new app in Azure AD. But what if you don't want to create an app registration? You already have a username and password, so creating a new Azure AD application just for authentication seems redundant.

Fortunately, there is way to authenticate to the Microsoft Graph API without any login prompts and without the need to create an explicit Azure AD application.

To avoid using any login prompts, we will use the AuthenticationContext.AquireToken method from the Active Directory Authentication Library (ADAL).

To avoid creating a new Client Id and Azure AD application, we will use a well know Client Id reserved for PowerShell: 1950a258-227b-4e31-a9cf-717495945fc2 This is a hard coded GUID known to Azure AD already.

Here are the steps we are going to do:

1) Make sure we have the username and password of a user in Azure AD
2) Use the username, password and PowerShell client id to get an access token from ADAL.
2) Use the access token to call the Microsoft Graph REST API.

Before going ahead, make sure you have the Microsoft.IdentityModel.Clients.ActiveDirectory.dll on your machine. If you have been working with Office 365/Azure PowerShell, chances are you have this already. If not, you can get it from a number of places. You can use the Azure Resource Manager PowerShell cmdlets to get a hold of it: https://docs.microsoft.com/en-us/powershell/azure/install-azurerm-ps?view=azurermps-4.0.0 or you can use nuget to download it: https://www.nuget.org/packages/Microsoft.IdentityModel.Clients.ActiveDirectory

And here is the PowerShell script to authenticate the Microsoft Graph:


Running this script gets the current user from the /v1.0/me endpoint:


Thanks for reading!

Create Azure AD App Registration with Microsoft Graph API and PowerShell

$
0
0
In my previous post, we had a look at how to authenticate to the Microsoft Graph API in PowerShell. In this post, lets have a look at how we can use the Microsoft Graph REST API to create an Azure AD App registration.

You need to create an App Registration in Azure AD if you have code which needs to access a service in Azure/Office 365 or if you are using Azure AD to secure your custom application. If you have been working with Azure/Office 365 for a while, chances are that you already know this and have already created a few App Registrations.

I was working on an Office 365 project recently where we had some WebJobs deployed to an Azure Web App. These WebJobs processed some list items in SharePoint Online. So naturally, we needed to use an Azure AD app to grant the WebJobs access to SharePoint Online.

For deploying this application, we were using Azure ARM templates and executing them from PowerShell. With ARM templates, we were able to deploy the Resource Group, App Service Plan, and Web App for the WebJobs. But for creating the App Registration, the two options available to us were the New-​Azure​Rm​AD​Application cmdlet which is part of the Azure Resource Manager PowerShell or the /beta/applications endpoint which is part of the Microsoft Graph API.

We found that the New-​Azure​Rm​AD​Application cmdlet is limited in features compared to the Graph API endpoint. For example, you can create an App registration with the cmdlet but you cannot set which services the app has permissions on. For setting that, you need to use the Microsoft Graph API which has the full breadth of functionality. That is why going forward, the Microsoft Graph should be the natural choice for creating Azure AD app registrations.

The way we are going to create the app registration is by making a POST request to the /beta/applications endpoint. The properties of our Azure AD app such as it's Display Name, Identifier Urls, and Required Permissions will be POSTed in the body of the request as JSON.

(As you have probably noticed already, this endpoint is in beta right now. I will update this post once it is GA)


1) Getting the App Registration properties:


The JSON we will POST will be an object of type application resource. Instead of manually "hand crafting" the JSON, it is recommended to download it from the Azure AD manifest of the app registration. Here is how:

a) Manually create an app in Azure AD by going to Azure AD -> App Registrations -> New application registration 

b) Configure it as required. E.g. Set the display name, Reply Urls, the Required permissions and other properties needed for your app

c) Go to your app -> Click on Manifest and download the JSON


Once you have the required JSON, you can delete the manually created app. Going forward, when deploying to another tenant (or the same tenant again), you can just run the following PowerShell script and won't have to create an app registration manually again.


2) Creating the App Registration with Microsoft Graph API and PowerShell:


Here is the PowerShell script you will need to create the Azure AD App Registration. I should mention that the Directory.AccessAsUser.All scope is needed to execute the /beta/applications endpoint.

After the script is run, we can see that the Azure AD app registration was successfully created:


What is happening in the script is that we are using the Get-MSGraphToken function to get the access token for the Microsoft Graph with ADAL. Then using the token, we are making a POST request to the /beta/applications endpoint. The JSON posted to create the app is pretty self explanatory in terms of displayname, identifier urls and reply urls.

What is really interesting is the requiredResourceAccess property which, at first glance, seems to have some random GUIDs. But this is in fact the Required permissions needed for my app. This JSON specifies that my app needs the following permissions:

1) Office 365 SharePoint Online: Read and write items in all site collections 
2) Windows Azure Active Directory: Sign in and read user profile

Your app might need permissions to different services. Just configure the permissions manually as required and then download the JSON from the Manifest.

After the script is run, when I go to Azure AD, I can see that my app has been created and all required properties have been set:


3) Trusting the app:


We have automated the creation of the application but it still needs to be trusted. Fortunately or unfortunately, it is still a manual process to trust the application. If you want to trust the app for all users in the tenant click on the Grant Permissions button:


Or if your application needs to be trusted by each user individually, you can skip this step. The user will be presented with a consent screen when they land on the application.

4) Troubleshooting with Fiddler:


If you have any errors while running the script, you can use Fiddler to determine the exact error being returned by the Microsoft Graph. I found it really helpful myself:

PowerShell would give me this:


But then I was able to get the real error from Fiddler:


Hope you found this post useful. Thanks for reading!

Access Microsoft Graph from classic SharePoint pages (SPFx GraphHttpClient preview: Under the hood)

$
0
0
Recently, an update to the SharePoint Framework was released which introduced some cool new features including ApplicationCustomizers, FieldCustomizers and CommandSets. You can read more about the announcement here:  Announcing Availability of SharePoint Framework Extensions Developer Preview.

What was particularly interesting to me was the introduction of the GraphHttpClient class which makes it really easy to call the Microsoft Graph from within the SharePoint Framework. To make a call to the Graph, all you have to do is:


And all the plumbing and authentication required to successfully execute the call is handled by the GraphHttpClient class.

At the time of this writing (12th June 2017) the only permission scopes available to the GraphHttpClient are Group.ReadWrite.All and Reports.Read.All So if you call any Microsoft Graph endpoints which require permission scopes apart from these, you will get an "Insufficient privileges to complete the operation." error.

Also, the GraphHttpClient is in preview right now and not meant to be used in production.

So lets see what's going on behind the scenes here. How does the GraphHttpClient get the correct access token scoped to the current user?

Turns out it is really straightforward. If you observe the traffic sent/received, you will notice that to get the access token, the GraphHttpClient makes a request to a new endpoint: /_api/SP.OAuth.Token/Acquire

Since this endpoint is hosted in SPO itself, it knows who the current user is and returns the correct access token. Some additional details are required to call the endpoint such as the current request digest and the resource for which the access token is required i.e. http://graph.microsoft.com

So in theory, if we replicate the behaviour of the GraphHttpClient in a classic SharePoint page, we would be able to call the same endpoint and get the access token. And it works!

Here is my code which uses simple jQuery to get the access token for the Microsoft Graph and makes a call to a /v1.0/groups endpoint. Since it is just JavaScript code, it can be called from a Content Editor or a Script Editor webpart on a classic SharePoint page as well!

And here is the result:


This is very interesting and can open up new possibilities!

Including only required Babel polyfills with Webpack

$
0
0
If you are using something like Object.assign or Promises in your ES6/TypeScript code, you will sooner or later come across the fact that IE11 does not support them natively. In such cases, the natural way forward is to include a polyfill to get them working.

Babel has a polyfill library based on core js which has polyfills for a lot of such ES6/ES2015 features.

But you don't want to include the entire polyfill library in your application if you are only using a couple of polyfills.

Here is a handy way to include just the polyfills you need using webpack:

1) Add babel-polyfill to your dev dependencies:


2) And then include the required polyfills in your webpack config:


This will make sure that only the polyfills you need are included in your webpack bundle.

More info here:
https://github.com/zloirock/core-js#commonjs
https://babeljs.io/docs/usage/polyfill/

Hope you find this useful!


Using Redux Async Actions and ImmutableJS in SharePoint Framework

$
0
0
I was recently working on converting my hobby project Office 365 Public CDN manager from JS, Knockout and jQuery into TypeScript, React and general ES6 code. It was a really great learning experience! If you want to see the final(-ish) code, have a look here: https://github.com/vman/SPO-CDN-Manager

While working on it, I came across libraries like Redux and ImmutableJS and how they help solve particular problems in React and the modern JS world. This really peaked my interest, so naturally, like all new things I learn, I tried to see how they could be applied to SharePoint. So in this post, lets have a look at what problems do Redux and ImmutableJS solve and how we can use them in a SharePoint Framework web part:

Source of this webpart available on GitHub here: https://github.com/vman/sp-dev-fx-webparts/tree/master/samples/react-redux-async-immutablejs


Why Redux?


I am going to assume that you are familiar with React and understand the basic concepts. If not, have a look at the tutorials on the react website, they are really great to get you started.

So as you know, the way React components work is every component displays it's UI based on the component's state. When the state is updated, the UI of the component is updated as well.

Since I was working with multiple components, I quickly realised that some events in my application would mean updating the state of more than one component. How do we make this happen? The easy (but not so great) solution was to move the state in the parent component of the two child components and then pass the state as properties to the child components. If we wanted to update the state from a child component, we would update it using a function (which is also passed as a property to the child component). When the state in the parent component was updated, it would automatically update all the child components as well.

This would quickly become tedious as more components are added to the application. The state will have to be passed down deeper and deeper in the component tree which is not really ideal.

Luckily, there is a nice solution to this problem with the introduction of Redux. With Redux, what we do is maintain the entire state of our application in a single object. This state is connected to our components and is passed as properties to them.  Any change to the state is defined with an Action which is dispatched when an event occurs.The Reducer receives the Action and updates the necessary elements of the state. (Which in turn updates the UI of the relevant component)

This is the general idea of Redux. If you want to have a deeper look and also check out some advanced concepts, there are some excellent tutorials here: http://redux.js.org/

Working of the SharePoint Framework webpart:


When the page loads, a redux action is fired which makes a REST API call using SPHttpClient to the current site and gets all the lists. Once the lists are fetched, another redux action is fired to instruct that all lists were successfully fetched from the server. The reducer listens for these actions and updates the state (UI) accordingly.

We can also create a new list from the webpart. When the user enters a value in the text box, an action is dispatched which updates the element in the state which represents the new list title. When the user clicks on the "Add" button, an action is dispatched which again makes an async call using SPHttpClient to create the list. Once the call is successfully returned, the UI is updated with the name of the new list.

Redux Async Actions:


Each async operation ideally has 3 actions to go along. This is not a requirement but is helpful to nicely manage our UI when the operating in being performed. We will see why we need 3 actions for one operation in the Reducers sections below. For now, all we need is a "request" action which we will fire before making the async call, a "success" action which we will fire after the aync call returns successfully and then an "error" action which will be fired if the async call returns an error.  Here are the 3 actions we will use in our webpart, and then a parent action to wrap them all together:


Reducers:


A reducer determines how the state should change after an action occurs. For example, when a "request" async action is triggered the reducer changes the application state to show a loading icon. When a request is successfully completed and it returns data from the server, the "success" action is triggered and the reducer determines that the loading icon should disappear and the data should be shown instead. Similarly, if an error would be returned from the server, the "error" action would be triggered and the reducer should show an error message on the screen instead of the loading icon. Here is our reducer code which modifies the sate using ImmutableJS. In this code, to keep things simple, we are only updating the state when the success action is dispatched. We are not showing or hiding a loading icon here.


When a reducer updates the state, a core principle of react is that we should never mutate the state object. We should always make a copy of the state, update the necessary elements in the copy and then return the copy as the new state. More details on why immutability is important here: https://facebook.github.io/react/tutorial/tutorial.html#why-immutability-is-important

ImmutableJS:


Let me begin by saying that using Immutable JS with Redux is not mandatory. We can use native ES6 features like Object.assign or the spread operator to create a new copy of the state, update the necessary elements and return the new copy. (Just remember that for supporting IE, we will need polyfills for these) If we have small to medium sized application, this is perfectly fine.

But if we are maintaining lots of elements in our state, making a new copy of state for every action can be really performance intensive.  For changing only a single element, we have to copy the entire state tree in memory, and that too for every action. Fortunately, ImmutableJS comes to the rescue here.

Using ImmutableJS, we can create a new state object in memory without duplicating the elements which are unchanged. When we create a new state object using ImmutableJS, the new object still points to the previous memory locations of unchanged elements. Only the elements which are changed are allocated new memory locations. The new copy of the state points to the same memory locations as the old copy for unchanged elements and it points to the new memory locations for the changed elements.

Here is our application state which extends the Immutable.Record class:

We have used TypeScript readonly properties in the state to mandate that these properties should never be updated directly. Instead, the custom "setter" functions should be used. In the setter functions, we use ImmutableJS methods such as "set" and "update". These functions take care of returning a new copy of the state where the only the changed elements are stored in new memory locations.
Hope you have enjoyed reading this post. Check out the full code of the web part here: https://github.com/vman/sp-dev-fx-webparts/tree/master/samples/react-redux-async-immutablejs

Using CSOM with an account configured with Multi-factor Authentication (MFA)

Working with the Page Comments REST API in SharePoint Communication sites

$
0
0
If you have been playing around with SharePoint Communication sites, you might have noticed there is commenting functionality available now on site pages. Digging deeper on how this functionality is implemented gives us some interesting findings!

There is a Comments REST API available which is used to get and post comments for a particular page. This endpoint is an addition to the SharePoint REST API, which means you will already be familiar with using it.

I checked with Vesa Juvonen from Microsoft and he has confirmed this is indeed a public API, which means it can be used in third party solutions and is not something internal used only by Microsoft.


There are a few interesting things about how the commenting solution is implemented:
  1. Comments are not stored in the page list item (which makes sense in terms of scalability). They appear to be stored in a separate data store.
  2. Comments are stored with references to list guids and item ids. This means that if you move or copy a page, comments for that page will be lost.
  3. Only a single level of replies is allowed. Which in my opinion is a good thing as this will prevent long winding conversations and force users to keep their comments brief.

Now lets have a look at the SharePoint Comments REST API:

1) Get comments for a page:

/_api/web/lists('1aaec881-7f5b-4f82-b1f7-9e02cc116098')/GetItemById(1)/Comments

This will bring back all the top level comments for a page which has the id 1 and lives in a site pages library with guid "1aaec881-7f5b-4f82-b1f7-9e02cc116098". 

2) You can also use the list title to get the list and the comments:

/_api/web/lists/GetByTitle('Site Pages')/GetItemById(1)/Comments

3) Get replies for each comment:

/_api/web/lists('1aaec881-7f5b-4f82-b1f7-9e02cc116098')/GetItemById(1)/Comments?$expand=replies

4) Get replies for a specific comment:

/_api/web/lists('1aaec881-7f5b-4f82-b1f7-9e02cc116098')/GetItemById(1)/Comments(2)/replies

Where 2 is the id of the comment. 

5) Post a new comment on a page by making a POST request to:

/_api/web/lists('1aaec881-7f5b-4f82-b1f7-9e02cc116098')/GetItemById(1)/Comments

6) To Delete a comment or a reply, Make a DELETE request to:

/_api/web/lists('1aaec881-7f5b-4f82-b1f7-9e02cc116098')/GetItemById(1)/Comments(2)

Since each comment or reply gets a unique id, the method is same for deleting both.

Here is some sample code I put together to use the Comments REST API in an SPFx webpart:


Get comments for a page:


Post a comment on a page:


Code for this web part available on GitHub: https://github.com/vman/spfx-sitepage-comments/

Quick note about running the webpart on the SharePoint Workbench: If the page on which you want to read or post comments lives in a communication site with url:

https://tenant.sharepoint.com/sites/comms/SitePages/ThisIsMyPage.aspx

Then make sure you are running the workbench from the same site:

https://tenant.sharepoint.com/sites/comms/_layouts/15/workbench.aspx

Hope you found this post interesting!

Simultaneously run multiple versions of the SPFx Yeoman generator with npx

$
0
0
This is a topic which has been discussed quite a lot since the launch of the SharePoint Framework. The SPFx Yeoman generator is recommended to be installed globally, but what if a new version is released and I want to try out the new version without uninstalling my globally installed generator? 

Waldek Mastykarz has a great post on the issue and suggests some solutions as well. Have a look at his post if you haven't already: Why you should consider installing the SharePoint Framework Yeoman generator locally

In this post, lets have a look at how we can use npx to provide a solution to this problem.

If you haven't heard about npx yet, it is the hot new member of the node ecosystem. Check out the introduction post by Kat Marchán:

In short, npx can be used to run npm packages directly from the command line without having to install them globally or locally.

npx comes bundled with npm@5.2.0 but unfortunately, the SharePoint Framework does not support npm@5.x.x yet. 

Lucky for us, npx comes as a standalone npm package as well: https://www.npmjs.com/package/npx

We are going to use the npx package with npm@4.6.1

From the intro post:

Calling npx <command> when <command> isn’t already in your $PATH will automatically install a package with that name from the npm registry for you, and invoke it. When it’s done, the installed package won’t be anywhere in your globals, so you won’t have to worry about pollution in the long-term.

This means that when we run the SharePoint Framework generator through npx, it will be as if it is running from a global install. After the SPFx solution is created, you will not find the generator installed either locally or globally. It has served it's purpose of generating us a solution and is no longer needed. 


Run different versions of the SPFx Yeoman generator in different folders: 


Now lets actually use npx to create two different SPFx solutions using two different versions of the SharePoint Framework Yeoman generator. We will use the latest version of the generator and the very first version of the generator which was part of SPFx Drop 1.

I am using the following command throughout the post to list the top level global packages:


I have done a global install for gulp already. This is to keep things simple as we only want to use npx for the SharePoint Framework generator. If we wanted to take things to the next level, we could use gulp through npx as well.

Now, let's go ahead and install npx globally:


After it's installed successfully, lets have a look at our global packages again:


As you can see, neither the SharePoint Framework generator, nor Yeoman itself is installed globally. This makes us free to use any version of the generator we want. Let's use the latest version, which at the time of this writing is 1.1.0

First, I am going to create a new folder named "latest" and navigate to it. Then run the following:


By specifying the -p (package) flag we run the yeoman (yo) and SPFx generator (@microsoft/generator-sharepoint) packages through npx. 

After that, we run the SharePoint Framework generator by running  -- yo @microsoft/sharepoint


Now let's run gulp serve to launch the workbench. As mentioned before, since we have already installed gulp globally, we don't have to install it again.


Now let's see the real power of npx. We will navigate to another folder and use Drop1 of the SharePoint Framework generator to create an SPFx solution.

I have created another folder called drop1. Lets navigate to it and run the following using npx:


As you have probably noticed already, the only difference in this and the previous npx command is that we are using the version numbered 0.0.65 of the generator and not the latest. This was the version of the generator when Drop 1 of the SharePoint Framework landed back in August 2016.


You will notice immediately that there are some differences in the wizard. It asks me whether to create a new folder for the solution or use the current folder. It also defaults to creating a web part and does not ask me whether I want to create an extension. This is obvious given that extensions were not part of the first drop. 

After running gulp serve, we can see the Drop 1 workbench running:


That's it! We have used two different versions of the generator to create two different solutions without having to install the generator on our machine!

Using a new version of the SPFx generator when an older version is already installed globally:


If you have been closely following the post, you know what is coming next. 

Let's say we already have a version of the generator installed globally. Now a newer version of the SPFx generator is released and we want to try it out immediately. All we have to do is use npx to run the latest version. We would be able to create a new SPFx solution with the latest generator and still keep our old generator installed globally!

The magic is described in the npx package description

If a full specifier is included, or if --package is used, npx will always use a freshly-installed, temporary version of the package. This can also be forced with the --ignore-existing flag.

This is good news because we want to have control over which generator version is used by npx to create our solution.

Here is how the process will look:


I already have the Drop 1 (0.0.65) version of the generator installed globally. Next, we are running npx and specifying it to use the latest version of the generator.

After the command is run, we are presented with the wizard which gives us the option of creation an SPFx extension. This option was not available with Drop 1 which means that the latest generator is being used to create our solution.

This is how we can use npx to explicitly specify the generator version and ignore the globally installed generator!

Where does npx store the packages?


If we navigate to our npm-cache folder, we will see that npx stores all the versions of the package in the cache. Here, we see that the @microsoft/sp-build-web package was used in both versions of the generator, hence both versions are being stored in the cache:


That's it! Hope you have enjoyed this post as much as I have enjoyed writing it :)
Introducing spfx-extensions-cli: A command line tool to manage SPFx extensions

SharePoint Online: Combine and reuse multiple site scripts in a site design

$
0
0
Site scripts and site designs were recently introduced in SharePoint Online/Office 365. They provide a great way to hook into the out of the box site creation dialog to apply customisation to the site being created. Here are some great articles if you want an overview of site scripts and site designs:


In the most basic sense, 

Site scripts are the JSON files used to define the artefacts to be created or the customisation to be applied after the site is created.

Site designs are site templates created by combining one or more site scripts. They can be assigned a title, description, preview image etc. which will be presented to the user in the 'Create new site' dialog.

In this post, let's have a look at how we can combine and re-use multiple site scripts to create site designs.

Here, I have a site script to create a document library on site creation:


Next, I have another site script to trigger a Microsoft Flow on site creation:


Now, here is a PowerShell script which will create 2 different Site Designs (templates). 

The first site design will only be configured to have the site script to create the document library.

The second site design will contain the same site script to create the document library. But in addition, it will also contain the site script to trigger a Microsoft Flow.


Once both site designs are successfully created, they will appear in the "Create a site" dialog on the SharePoint home in Office 365:


This way, you can combine and re-use multiple site scripts to create different site designs as per business requirements.

Troubleshooting:


1) Site scripts and site designs are in preview now and not meant to be used in production. They are also being gradually rolled out to Targeted Release tenants. I was only able to test them in 1 of my tenants. In all other tenants, I was getting the message: "The requested operation is part of an experimental feature that is not supported in the current environment."

2) You will need the latest version of the SharePoint Online Management Shell to get the site design cmdlets: https://www.microsoft.com/en-us/download/details.aspx?id=35588

Viewing all 134 articles
Browse latest View live